 How do I set up file permissions in Windows for PHP?
When using PHP permissions are misunderstood and common response is just giving too much access which is a security nightmare!
This is extremely important when configuring IIS manually on a VPS or Dedicated server, you want each site isolated from each other. This protects your server and other websites if one site is hacked or compromised.
If you’re just developing locally this isn’t too bad but it’s good practice to always configure it correctly, this will help find errors you may encounter in production but also that we should always be thinking about security.
Any reputable Windows web host would also be configuring their servers automatically using a control panel to configure secure permissions and website isolation so there is no need to worry about this if your with a shared website host. Most control panels will allow you to change if write permissions are enabled or not, this is a common fix for shared hosts and write permission issues.
Web development has changed a lot over the years and security is now a big focus point for web developers so while some would like to leave the IIS & Windows configuration to their server admins it’s good to understand and take responsibility.
It’s not hard to configure and after you’ve done it you’ll feel great knowing that you’re website is substantially more secure so let’s go.
Before we start, this post will assume you already have IIS with relevant features and PHP installed and working.
In the image below shows a basic example of how the security model works.

Each website runs as a different “user” and that user has access to their website folder. They also both have access to system and PHP files else that user couldn’t execute PHP to run.
Just a quick note before continuing, when running on Windows ignore anything that talks about the Linux security like the 770 or 665 flags, these aren’t compatible with Windows.
So where does this website user come from?
Either you can make a new system user for the purpose of the website or if you are running IIS 7 or higher you can run as a hidden IIS worker user. It’s hidden because you cannot just search for this user, you need to manually type in the name. In this we will be adding the IIS worker user to streamline the process.
First we need to create a new website with it’s own application pool.
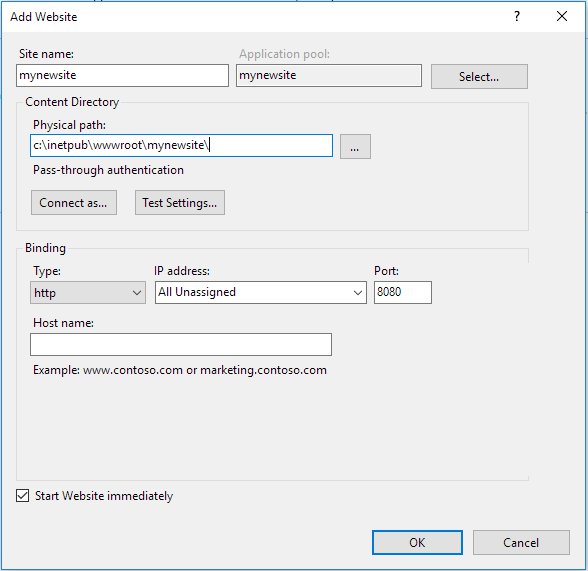
Fig A
If we check this new application pool in the advanced settings we will see that it’s running as the “ApplicationPoolIdentity”.
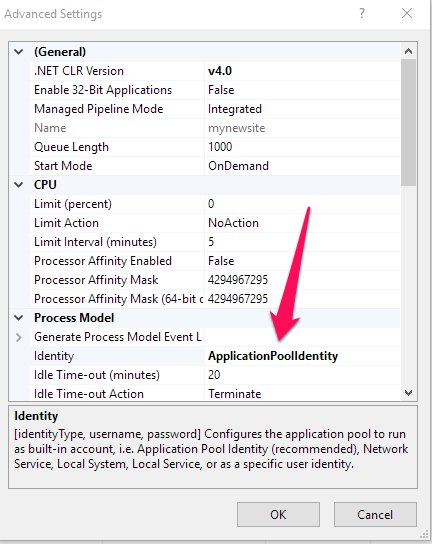
Fig B
Lets go add some permissions
First we need to change the permissions to our new website folder.
Navigate to the folder and open the properties page, go to the security tab and then Advanced.
Click “Disable inheritance” and choose “Convert inherited permissions into explicit permissions on this object”.
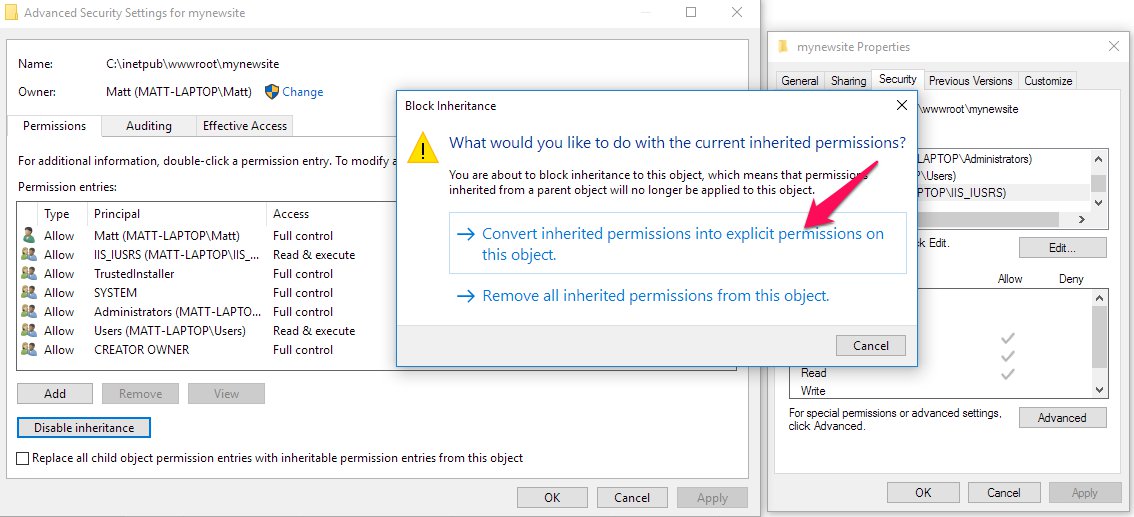
Fig C
Now that this folder has it’s own permissions (no longer inherited) we need to remove the users group and the IIS_USRS if it exists (Depends where your folder is). There may be other permissions as well but you really should only have System, Administrators, Creator Owner, your login name (not always) and trusted installer left on the folder.
We now need to add the IIS Application Pool to the folder, so click “Add” and on the next form click “Select a principal”, on this form type in “IIS AppPool\mynewsite” replacing “mynewsite” with your site application pool name from Fig A. Click “OK” and if you’ve done it right it will fill in the Principal as the Application pool name as per below (1, Fig D).
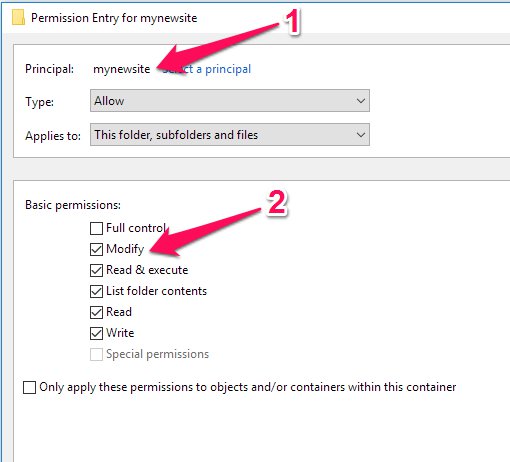
Fig D
For most sites you will want write and modify permissions so go ahead and tick modify (it will tick write automatically) and then “OK” this form. A couple more “OK”‘s and you’ll have saved the new permissions!
Well Done, if all goes well you should now be able to browse to your site and confirm it’s working.
I used a simple PHPinfo file to test ours.
HELP It Didn’t Work!
There are range of reasons why this wouldn’t work.
Here are a few things to try:
- If your getting a 401.3 Error we need to check that the website is indeed using the Application Pool identity.Go to IIS and select your website, double click “Authentication” to open this feature. Right click “Anonymous Authentication” and select edit. Make sure that “Application pool identity” is selected and click “OK”.
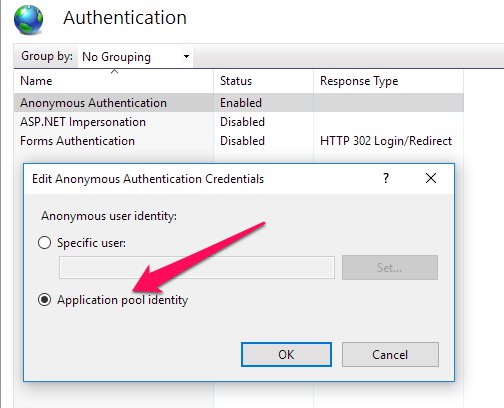
Try your website again and see if this fixed the issue.
- Does the application pool have access to PHP?This error will generally show as a 500 Internal Server Error. In the details section it will show as a FastCgiModule with the name of the handler listed.
To verify if this is the problem, add the “IIS AppPool\mynewsite” user to your PHP folder.
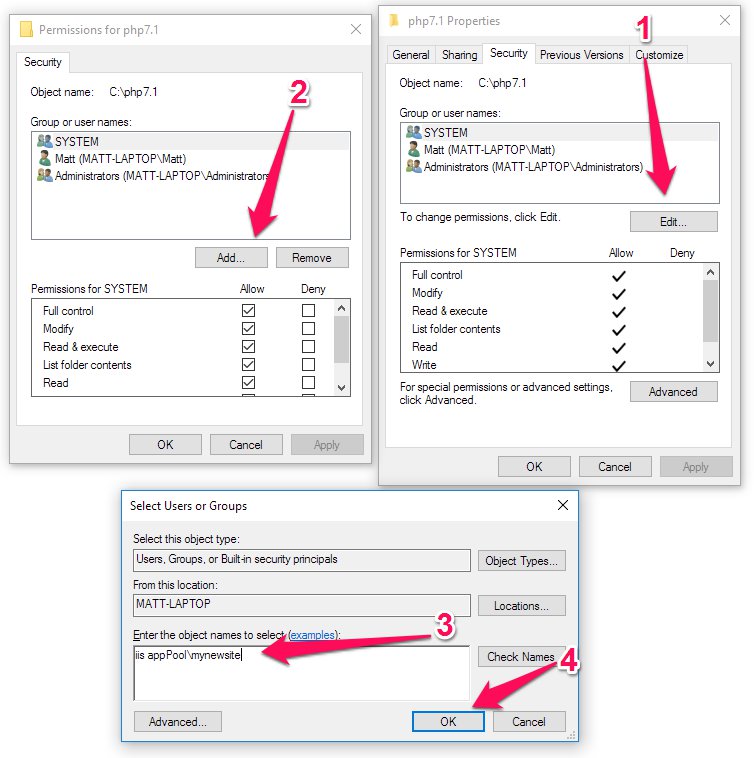
After doing this restart IIS and try running your site again. (Sometimes you need to restart IIS so always do this else you may miss when you’ve fixed the issue) - If this fails, we really need to diagnose where the issue is before trying anything else.The best way to diagnose this is using Process Monitor from Sysinternals, how to use this tool is a out of scope for this post but as an overview you run it while trying to go to your website. We then look for any access denied’s for file operations, then we can find out what user is trying to access which file and fix the permissions on that.Let us know if diagnosing this way would be interesting for a blog post as it’s a tool we’ve used extensively when diagnosing hard to fix issues.
Now this is a very basic overview of how to configure a single website with basic file security in mind, if this were a VPS or Dedicated server care should be taken to lock down the whole machine permissions wise even if it’s only for internal websites.
Aspire Web offers consulting so if you need a hand fixing or deploying a Windows server just contact us and we’ll see if we can help.